Showing posts with label Embossing. Show all posts

Monday, September 23, 2013

A Basic Birthday– FMS104

Just a quick post today- I hope to be back tomorrow.  This week is busy, busy working on birthday, visitor and baby cards for my church.  I love being able to serve this way.

But I did take time to play in the current Freshly Made Sketches challenge.  I played a lot when they first started, but got out of the challenge mode.  Now….I am back!  Here is the sketch and my card.  If you take a moment to visit the Freshly Made website, you will find lots and lots of inspiration for your crafting.

FMS104 9-20-13
Happy Birthday - Eleanor - Basic Gray 9-20-13FMS 104

I turned the sketch a bit and chose a Clean and Very Simple design.  It is almost monocromatic- one of my favorite color combos.  But, I love Coastal Cabana and our glimmer paper so much, I am adding a touch to almost every card these days.

All supplies are Stampin’ Up!  Shop my store 24/7.
Stamps:  Everything Eleanor, Perfectly Penned; Paper:  Basic Gray, Coastal Cabana cardstock, Silver Glimmer Paper, Coastal Cabana DSP;  Ink:  Basic Gray; Accessories/Tools:  Honeycomb Embossing Folder, Big Shot, 2-1/2” 
Circle Punch, Basic Rhinestones

I hope your Monday is off to a great start.  Our Bible Study group meets on Monday nights…so this a favorite day of the week for me.

Blessings,
Diane

Thursday, August 29, 2013

Paper Craft Crew Sketch Challenge Card–PCCCS056

I am a big admirer of Justin Krieger and when I learned he was a designer for a new to me sketch challenge blog, I knew I wanted to play along.  You can see Justin’s fabulous creations at JK Cards.  Here is the sketch and my card for the Paper Craft Crew Sketch Challenge # 56.
130523-PCC-Sketches-v1-004-231x300
Paper Craft Crew 56 8-28-13

I {heart} this card!  My inspiration came from another terrific designer and fellow Stampin’ Up! Demonstrator Cecile Ortiz at Lezards de Cilou.  I clear embossed the seashell and fish after stamping in black, then sponged various color inks to highlight ocean colors.  Then did a little fussy cutting (which I love).  Using Cecile’s technique, I added depth with my stylus and double mounted the pieces.  You really can’t see it, but it is pretty darn cool IRL.  I hope you enjoy.

Supplies (all Stampin’ Up!):  Stamps:  By the Tide; Paper: Rich Razzelberry, Pool Party, Bermuda Bay, Silver Glimmer Paper, Soft Suede and Very Vanilla; Ink: Pool Party, Soft Sky, Regal Rose, Wild Wasabi, Wisteria Wonder, Crushed Curry, Rich Razzelberry and Black Stazon; Accessories and Tools:  Oval Framelits, Basic Rhinestones, Stylus, Paper Snips, Clear EP, Versamark, Heat Tool, Circle Punches, Fancy Fan EF.

There is so much going on everyday in my life.  I never dreamed that being retired meant having something to do pretty much all the time.  I think we retired folks take on projects because we think…”well, I am retired so I have all this time…”

Well, I don’t!  I finished this card yesterday afternoon, but didn’t have time to post because of doctor visits.  Then today we had a house showing in the morning (house is for sale-downsizing like retired ppl should do) so we had to get out and roam awhile; then a visitation at the funeral home for a friend’s mother; then a meeting with our financial advisor this afternoon.  All of which interferes with my stampin’ time.
But I always have time for the sweet Princess Bella.  Here’s a cute pix of her all ready for the pool.  I just love this cutie.
Bella goggles 8-13
Blessings,
Diane

Monday, August 26, 2013

Christmas In August? Merry Monday # 72 and Just Add Ink # 179

It has been much too long since I participated in a card challenge.  A few years ago I would stay up at night waiting for the various challenges to be posted.  Then life (and Princess Isabella) and blog readers came along and unfortunately I spent more time reading blogs than creating.
So what motivated me today?  With September approaching, it is time for my favorite crafting time of the year- the holidays.  So I am beginning with Merry Monday and Just Add Ink sketches.  They were similar and a chance to use my new favorite element- WASHI TAPE!
Merry Monday 72 and Just Add Ink JAI 179 hallenges 8-26-13

Recipe: (all product available 24/7 at Diane’s Demo Site)
Paper: Whisper White Cherry Cobbler, Champagne Glimmer Paper Stamps: Gorgeous Grunge, Ornament Keepsakes, Teeny Tiny Wishes; Inks: Versamark, Gumball Green Accessories and Tools: Season of Style Washi Tape, Holiday Ornaments Framelits, Big Shot, Gold Embossing Powder, Heat tool, Modern Label and Word Window punches, Basic Rhinestones, Linen Thread, Dimensionals
 
Before I sign off, here is a sweet photo of the Princess brushing a llama at a Fun Fair event here.  We read a Llama, Llama book at bedtime when she is visting and she just squealed when she saw one in real life.
Isabella and Llama, Llama
I hope your week is off to a great start.  Have fun and thanks for visiting.

Blessings,

Diane


Tuesday, November 20, 2012

It’s Beginning to Look a Lot Like Christmas……

and it isn’t even Thanksgiving!  But, as with most other parts of our life, we must plan ahead in order to be on time.  And nothing is more true than getting ready for Christmas.
In August I had a little Holiday Happenings workshop and we made four really cute Christmas projects using Stampin’ Up! paper, ribbon, die cuts, ink – all the good stuff.  And we made a gorgeous Fall Wreath (will be on another post). First up, a set of four 4”X4” ceramic coasters using Candlelight Christmas Designer Series Paper and fabric.  So very easy and inexpensive, but such a cute and useful gift.
Coasters   2
Coaster supplies:  4”X4” ceramic tiles from big box store $.16 each- Hello!; Candlelight Christmas Designer Series Paper and coordinating fabric; Ornament Keepsakes Framelits, Scallop Oval Punch and Medium Oval Punch, Sentiment from retired stamp set, Gold Glimmer Paper, Linen Thread, Clear Acrylic spray; Real Red ink, Gumball Green, Whisper White and Real Red Cardstock, Big Shot.
Next, a Christmas Blessings Journal.  We covered a composition book with Be of Good Cheer Designer Series Paper, embellished with Silver Glimmer Paper Snowflakes and even embellished a pen to match.  Easy peasy and Oh, so useful.   A journal of blessings for the entire year.  I know that mine will be full.  God blesses me with his grace every minute of every day.
Journal Blessings Journal Supplies: Composition book from big box store; Be of Good Cheer Designer Series Paper, First Edition Specialty Designer Series Paper; More Merry Messages Stamp Set; Gumball Green, Cherry Cobbler , Whisper White cardstock; Silver Glimmer Paper; Early Espresso Stamp Pad; Snow Flurry Bigz Die, Large Basic Pearl, Tasteful Trims Die, Big Shot.
Another very quick and easy project – a set of four cute, cute, cute notecards.  They measure 4”X4” (loving that size today) with matching envelopes.  I completely copied (very legal in Stampin’ Up! world) the terrific creation by uber-demonstrator Mary Fish.  You just can’t improve on perfection, I say.  Don’t you agree?
Card Set
Scentsational Scents Supplies: Scentasational Season, Sweet Essentials, Tiny Tags and Fabulous Phrases Stamp Sets; Crumb Cake, Whisper White, Daffodil Delight Cardstock; Regals Paper Pack; Early Espresso, Cherry Cobbler, Pacific Point Stamp Pads; Holiday Collection Framelit Dies; Gold and Cherry Cobbler brads; Real Red button; Basic Rhinestone; Tiny Tag Punch; Cherry Cobbler Baker’s Twine, Big Shot.
And finally, the prettiest Christmas Tree in the house!  It is a Rolled Christmas Tree using Be Of Good Cheer Designer Series Paper, assorted buttons and cardstock embellishment- a project to exercise your creativity!  And, again, not my original idea- got this one from Pinterest.  I could just kiss the folks that started that site….Anyway, easy peasy again.  Here are very quick instructions: Cut 17 strips of DSP 2” wide and starting at 5-1/2 long (your bottom strip), decrease length of each strip by 1/4  with the last strip being 1-1/2 long X 2” wide.  (i.e. 5-1/2, 5-1/4, 5, 4-3/4….) Then apply Sticky Strip to one long end, wrap around a dowel and glue making a tube. Add another piece of Sticky Strip to the seam.  Glue your handcut and embossed trunk to the bottom center and start building your tree.  Adhere with more sticky strip.  Embellish as you wish and Voila!  Gorgeous!!!
Rolled Christmas Tree
Rolled Christmas Tree supplies:  8”X10” white canvas from big box store (2 for $4- love it!); Gumball Green Core’dinations Paper, Cherry Cobbler Cardstock; Be of Good Cheer Designer Series Paper; Silver Glimmer Paper; Simply Scored (for rosettes); Various buttons; Woodgrain Embossing Folder; Various circle punches; Wooden Dowel, Sticky Strip.
Whew- this could be my longest post ever- but I hope you enjoyed.  We had a wonderful day making these cute projects.  In fact, I have made several more of each for Christmas gifts this year.  What fun!
Blessings and I pray you all have a wonderful and thankful Thanksgiving Holiday.
Diane

Monday, November 7, 2011

Stampin’ Up! Louisville Regional–How Fun is That?!!!

My sweet friend and my upline Lisa and I attended the Stampin’ Up! full day Regional Event in Louisville, Kentucky the last weekend in October and it was wonderful!  Our trip was so fun and we saw some amazing color on the trip.  God is truly in the details.

The demo demonstrations were awesome and I truly appreciate the time that my fellow demonstrators gave to teach us new tips and techniques.  And the home office gals- well what can I say.  Terrific as usual. 

One of the traditions at all Stampin’ Up! events is the “Swap.”  Many of the attendees make a number of “swap” cards or other items and swap with other attendees…well, you get the picture.  And here is a photo of the two tags I made for the swap.

I made about 75 of the first tag as my general swap and then around 10 of the more detailed tag.  Both tags use Creative Elements and Established Elegance and on the general swap I used the fabulous Morning Mocha Specialty Designer Series Paper.  I had so much fun making these and can’t wait to get started on my Leadership swap item that will be held in January in San Antonio. 

Regional Swap Tag-1Regional Swap Tag - Enhanced2

AND, at each we could add our swaps to be taken back and shared with the Home Office staff.  From those the Stampin’ Up! staff attendees chose their two favorites and announced the winners at the end of the day.  Boy was I honored when Bonnie Thurber called my name and flashed a photo of my more detailed tag on the big screen!  What an honor when she said that one reason they chose my tag was it looked like one that Shelli would make.  (Shelli Gardner is the co-founder of Stampin’ Up!).  I managed to make it to the stage to receive a beautiful card and gift certificate.  I absolutely loved the tag and am so pleased that others did too!

Well, not gonna toot my horn again for awhile.  But I had to share that with you.

We spent the weekend in Franklin with a little “under the weather” sweetie.  More about her on my next post.

Blessings to all,

Diane

Monday, September 26, 2011

Freshly Made Birthday

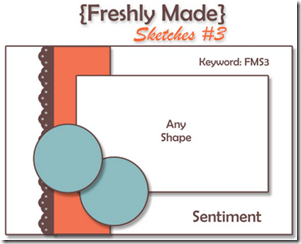
I have been working on this card for days…and I think I went a little overboard.  I am really a Clean and Simple gal, so when I do make a more intense card I just can’t stop with the embellishments and textures.  And this card has it all!  The image panel looked a little plain, so I fringed the top and bottom.  Used the new cute Houndstooth embossing folder from Stampin’ Up! for the first time and cut some little buttons  for the corner.  Then, since I was on a roll, I ran the sentiment through the crimper.  I probably used 50 Stampin’ dimensionals – everything is “popped up.”  But, after all that, I really like this card- it will be perfect for a “little” friend birthday.  Here’s the sketch we were given for the Freshly Made Sketches Challenge # 3:
FMS3 Sketch
And, here’s my card:
FMS3 Happy Birthday Up Up and Away
All supplies by Stampin’ Up!  I hope this is the beginning of a wonderful week for you.

Thursday, September 15, 2011

KA–POW a Brand.New.Terrific.Challenge.

The Ultimate Artistic Avenger, aka Carrie Gaskin, one of my very favorite paper artists and sister Stampin’ Up! demonstrator has started a new challenge for her stamping followers.  The KA-POW challenge will be issued every other Tuesday for now and you can read more right here.

KA-POW Kreative Challenge # 1 is a very cool color challenge.  Here are the challenge colors:

Kapow-Kreative-Challenge-KKC011-300x199 - colors

And, here’s my card using an awesome new stamp set from the new Stampin’ Up! Idea Book and Catalog.  Creative Elements has so many great images- the cards practically make themselves!  I used all the colors above plus some Naturals White, a few Basic Rhinestones and Pearls, the Perfect Polka Dots textured embossing folder and the oval from the new Designer Frames folder duo.  And, I love, love this card.  I did a lot of distressing in honor of Carrie’s style, and rolled a few corners.  I hope it makes her smile a bit.  (Don’t you love these little rolled flowers?  They are too easy…I will tell you how next time.)

KKC01 - Creative Elements - distressed---

I will be back soon with news about Isabella! and our marvelous Alaskan cruise.

Friday, June 3, 2011

Scripture Stampers–Something Old and Something New

Last night was our May stamp club meeting (I had to delay one week so we could visit our sweet Isabella) and the Scripture Stampers were in full force.  We made three cute projects and I loved each one.  Linda was our hostess and she chose Colossians 4:2 – the definitive verse about prayer.  I was not surprised because Linda is a dedicated prayer warrior…you absolutely want her on your team!  The scripture card I designed that will go into our sweet little scripture box used our theme designer paper, Springtime Vintage (old) along with Baja Breeze, Not Quite Navy, the Top Note die and Framed Tulips embossing folder.  We all love projects made with the Big Shot. 

I always try to make a little treat for the members each month, but yesterday I was stumped on ideas and could not decide what to do.  Then I had a brainstorm and made a quick trip to Dollar General and bought a bunch of 3.5 X 5 inch acrylic frames and got to work.  I knew I wanted to use the brand spankin’ new Flower Fest set from the Summer Mini and the new embossing powder on a project, so I got busy embossing and punching and cutting.  I didn’t get everything done before the gals arrived, so assembling the elements became our first project.  The sentiments are from two sets that are on the Last Chance list (tear) – Sense of Time and Simple Friendship.  Although they will be gone, they will not be forgotten.  The final project used all current products, including the fabulous Elegant Bouquet embossing folder and had a little twist.  After the image was stamped, we sprayed it with spray adhesive, covered with a used dryer sheet, then covered with Dazzling Diamonds (gorgeous glitter), cut the dryer sheet to size and popped up on our card.  Pretty, pretty.  Who knew?

Take a look-see- and as always, you can shop Stampin’ Up! 24/7 on my website here:
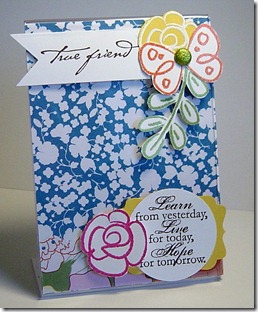
Decorated Frame6-2-11 Linda - Dryer Sheet - Just Believe6-2-11 Linda Col 4-2

I am sitting here waiting not so patiently for Mr. Brown (UPS) to roll up with my expedited Stampin’ Up! order that will also have my copy of the new Idea Book and Catalog that goes live on July 1.  I’ve been to the door at least ten times…it’s on the truck and out for delivery and I am hoping he gets to us earlier than his usual last delivery of the day.  I know that patience is a virtue- just not today!

Thanks for visiting and before you go say hi! to sweet Isabella- all dressed up this week:

photo (12)

LinkWithin

Related Posts with Thumbnails